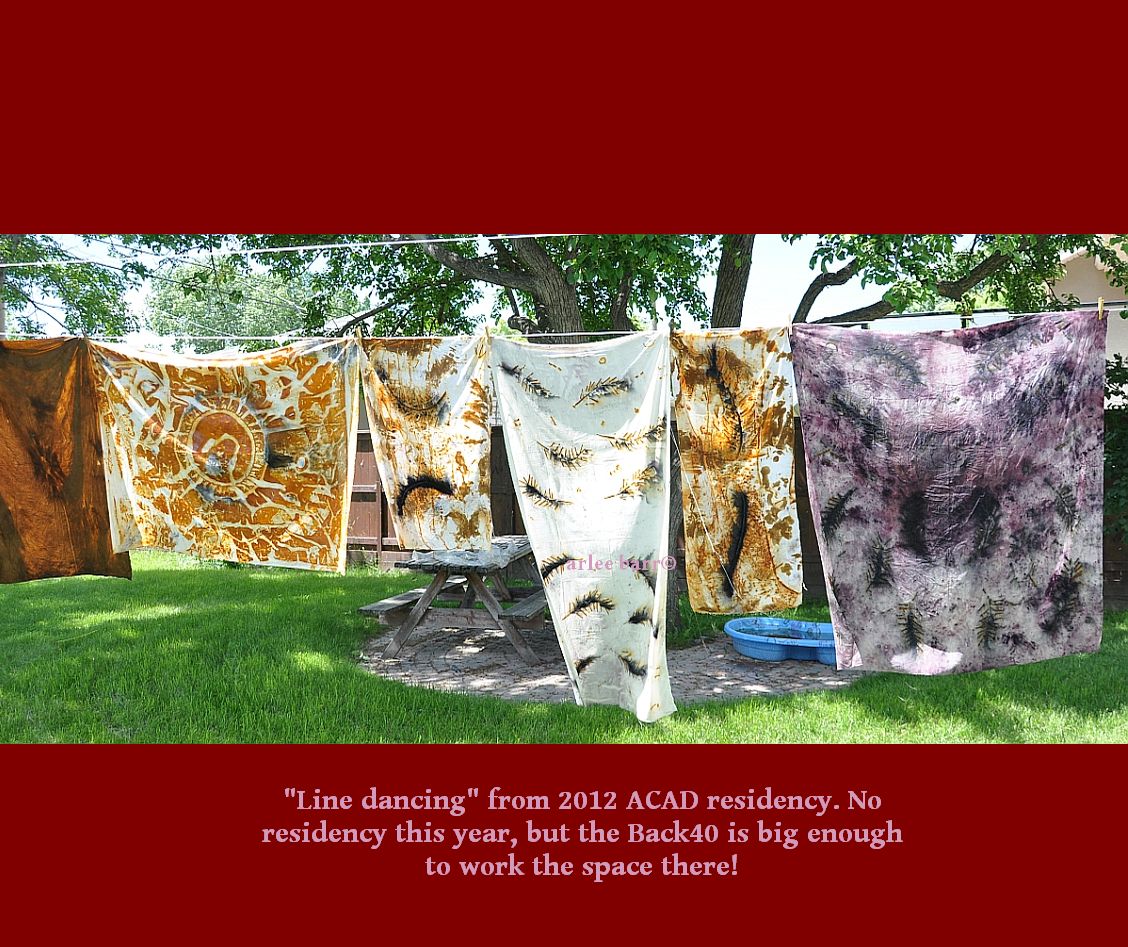
The current “line dance” is all whites and creams as i prep with scouring and premordanting. Packs and big pieces coming soon! New dyes to work with, new fabric types, the Back40 will be a workshop space this summer!
The current “line dance” is all whites and creams as i prep with scouring and premordanting. Packs and big pieces coming soon! New dyes to work with, new fabric types, the Back40 will be a workshop space this summer!
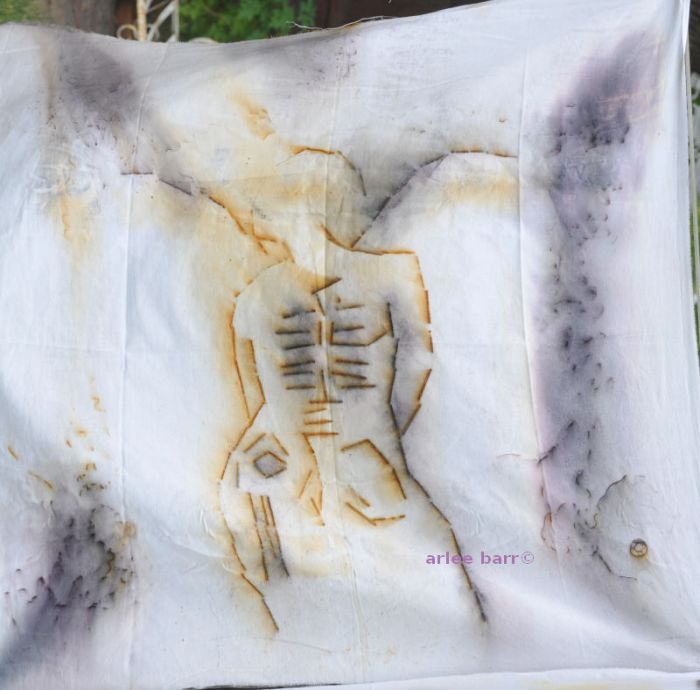
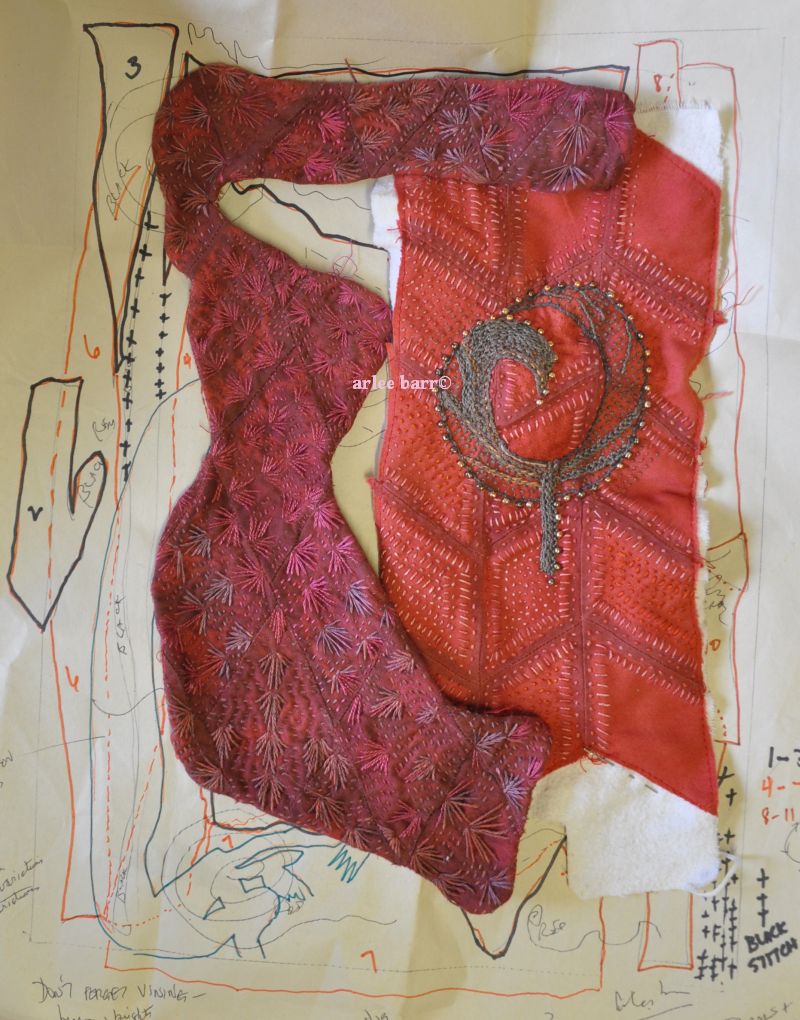
I pulled out the original 2014 sketch that started all this.

Not quite as many “holes” in this version:
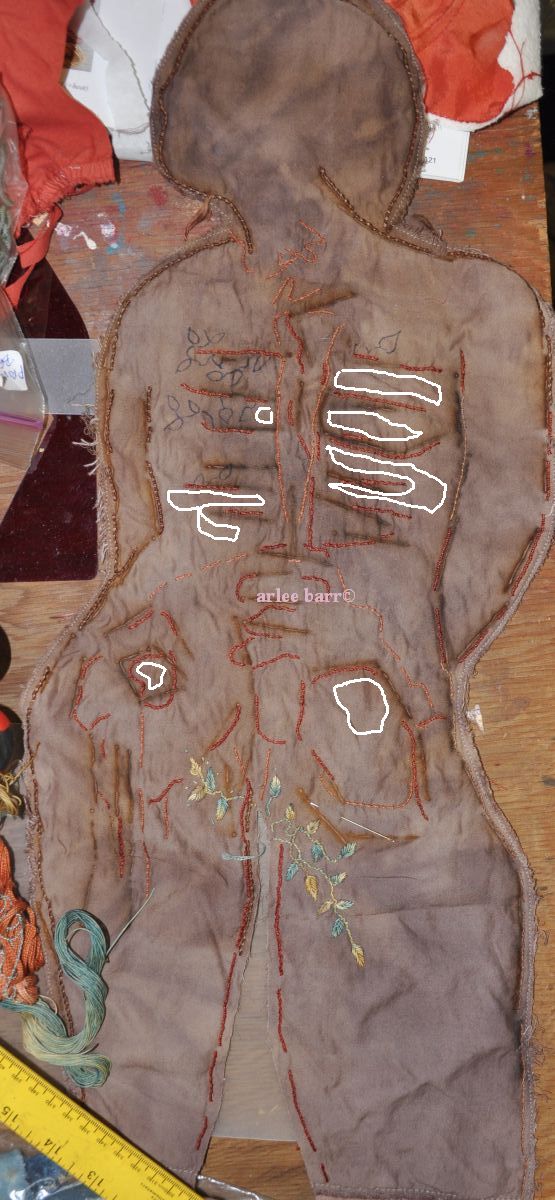
But there will be some:

Someday, i’ll do a more faithful interpretation of that sketch. Maybe the Next Big Thing, as i love those red wings also.
(Remember, all photos are clickable for details.)
UPDATED Oct 7/20
Oh, but it’s a pretty colour anyways.
Well, i can always overdye it.
But it was/looked clean when i bought it to dye.
It doesn’t matter, my clients like this colour.
But Famous Author *always* does this.
I don’t wash these anyways.
Did too scour: I washed this with my socks, before i dyed it.
Vinegar is too a mordant, you freak.
You’re just jealous i got dye from strawberries, ______, _______ and _____. (Insert appropriate inappropriate plant material here.) (This is usually said when said player has it explained to them, that even mordanting will not “fix” fugitive dyes.)
Here’s why you should scour, and pre mordant. Left to right: unwashed cotton, dye didn’t penetrate completely, many white spots visible, stiff as a f*****g board. Next, scoured only (soft as a baby’s butt!!!), no mordant, some colour uptake. Last, scoured and premordanted, deeper colour uptake. All were dyed in same pot of quebracho rojo, at the same time.
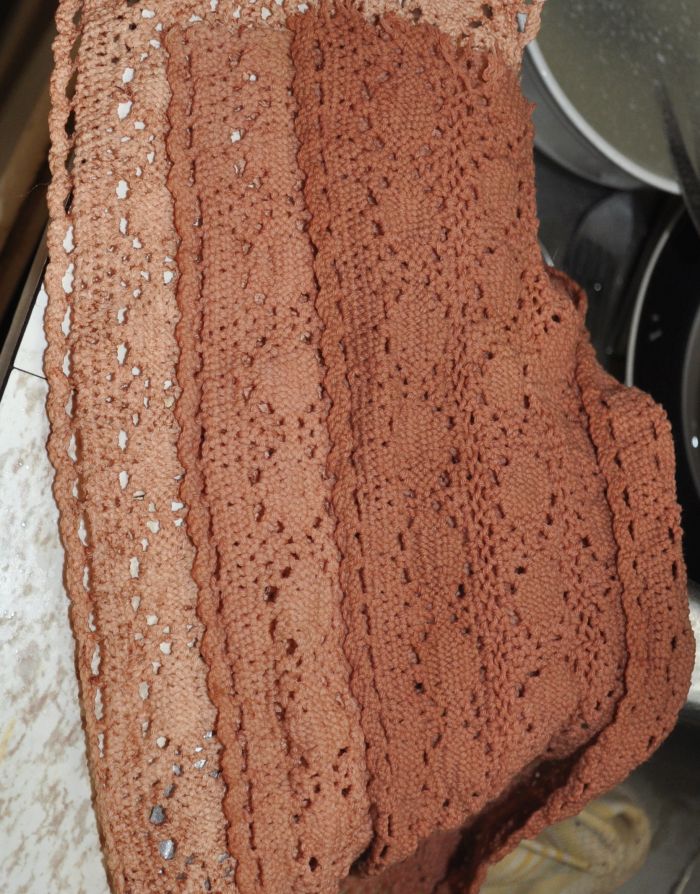 And please “but the colour is so pretty anyways” is not a good way to dye: the colours on the unscoured and unmordanted especially will/did wash out and will continue to do so, the scoured only will lose most of its colour with each subsequent wash, while the scoured and mordanted piece will keep its colour. And even “new” fibres that look clean need scouring.
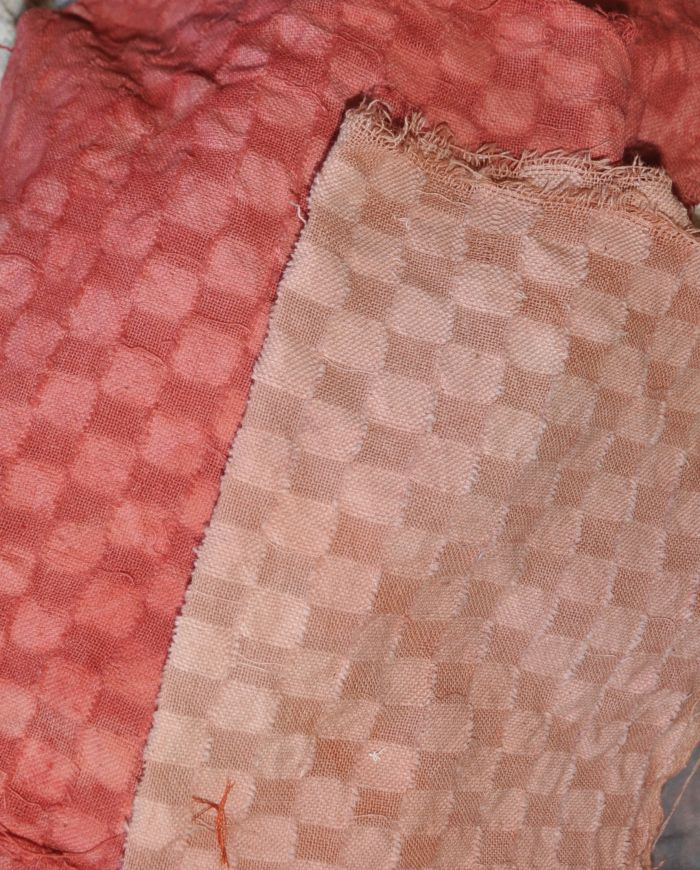
Below cotton also, left scoured and mordanted, right scoured but no mordant.
A perfect example of what happens if you don’t scour properly, lesson learned in June last year:
I thought i had done enough on a new thread, but when i put them in tannin, this happened:
GREEN?????? I contacted Maiwa, my trusted supplier, and asked if perhaps it had been the soda ash in the initial scouring that had reacted (maybe not rinsed enough), as gallnut is a clear tannin, and stays to the “browner” tones after being used and stored. Nope.
Hi Arlee,
This is rare but it does happen, but it is not from the soda ash. Fabrics are often pretreated and contain substances which can leach out or react with the mordant. When used on it’s own Maiwa’s gallnut extract is usually a clear/colourless tannin. I would suggest trying other cotton fibres from different sources and comparing the results.
Best,
Danielle
I had to REALLY scour again, properly, to get the green out of the threads! And it’s not that these were second hand or cheap threads–they were brand new, brand name, tightly plastic packaged and tightly boxed for shipment. Subsequent threads scouring has given baths of brown, yellow and absurdly, PINK. SCOUR YOUR THREADS TOO! Don’t skimp on this step. Even “PFD” (prepared for dyeing) fabric in MY opinion should be scoured—a. it’s been “prepared” for synthetic dyes, and b. you don’t know how much it’s been dragged over warehouse floors, handled, packed or shipped. (MMM, someone had tacos for lunch and wiped their fingers on the silk. SHARESIES!)
After scouring, I mordant EVERYTHING, according to fibre type. I *know* substantive dyes like indigo and walnut don’t require mordanting, but given that i use a lot of dyes that do need it, i’d rather have everything pre-done in case i grab the wrong chunk. Pre mordanting will not hurt substantive dyes. Some may be stripped out by a chemical indigo vat, but you should mordant again after indigo if you are going to overdye with another natural dye.
EDIT: Oct 7/20 Here’s another object lesson from my Dye Dungeon. I bought brand new white cotton velveteen, and lazily scoured it only once, and for only 45 minutes. I hung it to dry, and in the morning, THIS was on the floor:

I don’t know what textile additive this was, but i suspect because of the oil like iridiscent sheen it was a solvent, or other petroleum based product, something that is definitely not coming out easily, and that would certainly inhibit the uptake of mordants and dyes. I had wondered why the fabric took up very little dye:
 This “should” have been a deep rich colour, as it had been properly premordanted according to fibretype.

So i threw it back in a big pot, and as soon as it started boiling (above photo), i knew there was still a lot of crud in it. At the end of the first hour long boil up, it looked like i was using a walnut dyebath–it was that dark and disgusting! It took 2 more boils at 45 minutes each, each successive pot with 2 heaping tablespoons of Borax, 2 of soda ash and some neutral soap, to get the water clear. (J.Liles recommends some fabrics be boiled up to 4 hours!)
There must have been a hell of a lot of fibre additives, because the snow white fabric i initially started with is now a lovely CREAM. That’s okay though, still a good base colour, and significantly, the plushness is softer and thicker feeling, probably due to shrinkage. (Be aware that scouring can shrink things as well, and better to know *before* you make plans than after and have lost 2-15% length or width!) Note too, the cleaning aspect i used is for CELLULOSE only. Soda ash will destroy proteins, and i doubt Borax is good for them either.
While we all know (or should if you do a little research) is that textile manufacturing is loaded with chemicals, whether it’s naturals or synthetics. Not all are done in one dedicated plant that does “only” synthetics, “only” naturals, and i suspect few that are “ONLY” “organic”. (Fact in case, that cotton lace in the first photo, had some suspiciously plastic filaments stuck in it, meaning the factory had produced synthetic laces as well, either on the same machine before, or near by on another run.) Some of the chemicals are cleaners, some are part OF the fabric, some are added after to give weight, sheen, dyeability and effect, and a lot of them ARE in our natural fibres, whether you think them clean or not. LINK> This will tell you how many additives and processes are used, most of the time. I remember when i was a young teenager, some fabrics *smelled REALLY weird”—turns out it was formaldehyde! I have friends who still can’t go in fabric stores because of their health conditions and all these chemicals.
HOW to scour? Maiwa: https://cdn.shopify.com/s/files/1/1086/6542/files/natural_dyeing.pdf?2077475857497476456 NOTE: different scour methods for cellulose vs protein fibres. I use neutral soap and soda ash, or neutral soap and borax, or just neutral soap, depending on what i have handy, and depending on the fibre type.
HOW to mordant? Maiwa: https://cdn.shopify.com/s/files/1/1086/6542/files/natural_dyeing.pdf?2077475857497476456 I sometimes add a tannin step to protein fibres, not because they need it, but because they will extend the colour possibilities.
Yes, they are the same link. Maiwa has the BEST, FREE information available that is accurate, researched and trustworthy. Save the link, print it, share it, USE it.
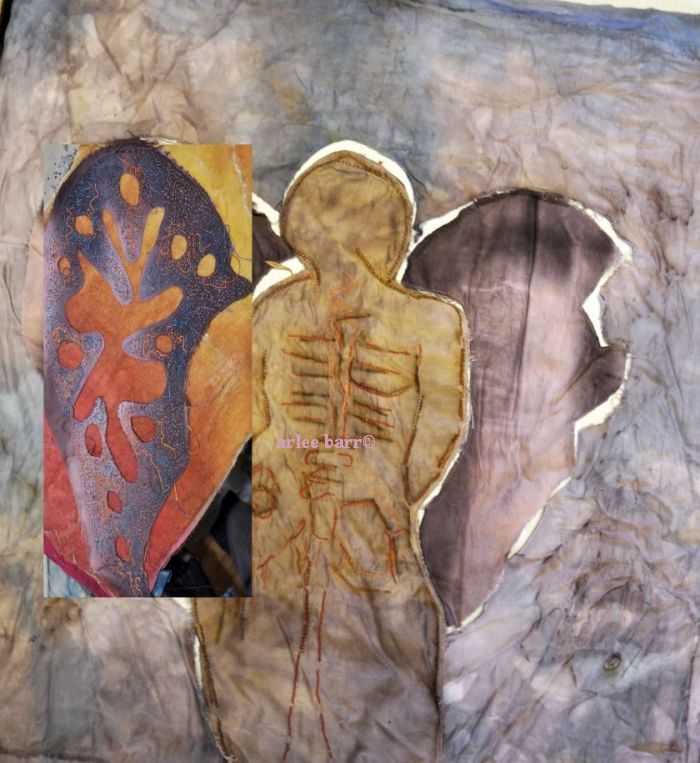
I don’t know WHAT it is about this piece that keeps stalling work. I LOVE the idea, the form, the work so far (with a few minor colour quibbles), but she’s been pinned to the design wall again for 6 months with no more stitching done.
She started like this, created during my ACAD residency in 2016:
In August of 2017, she had this much (little!) work done on her:
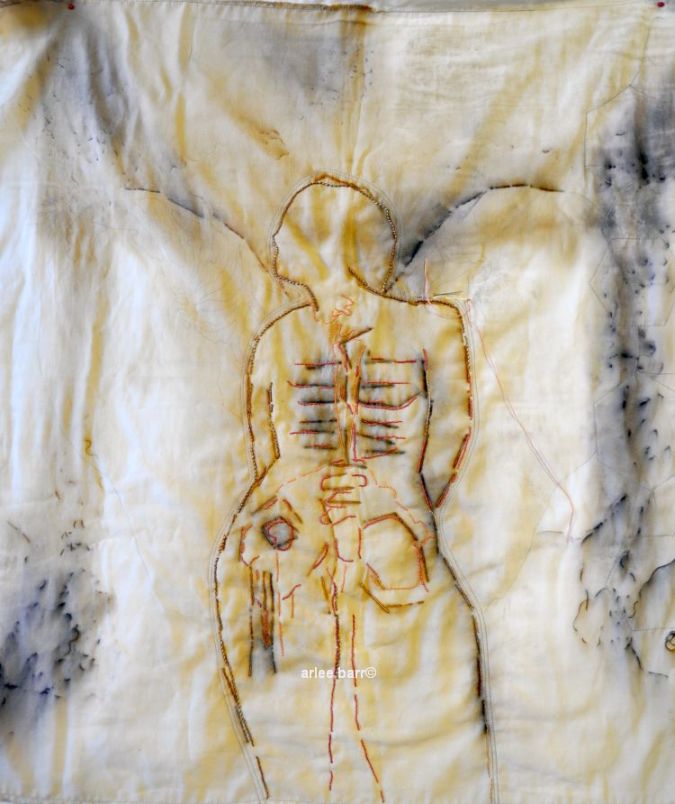
Rolled up and stuffed away, until i got ruthless in October of 2018 and cut her into pieces:
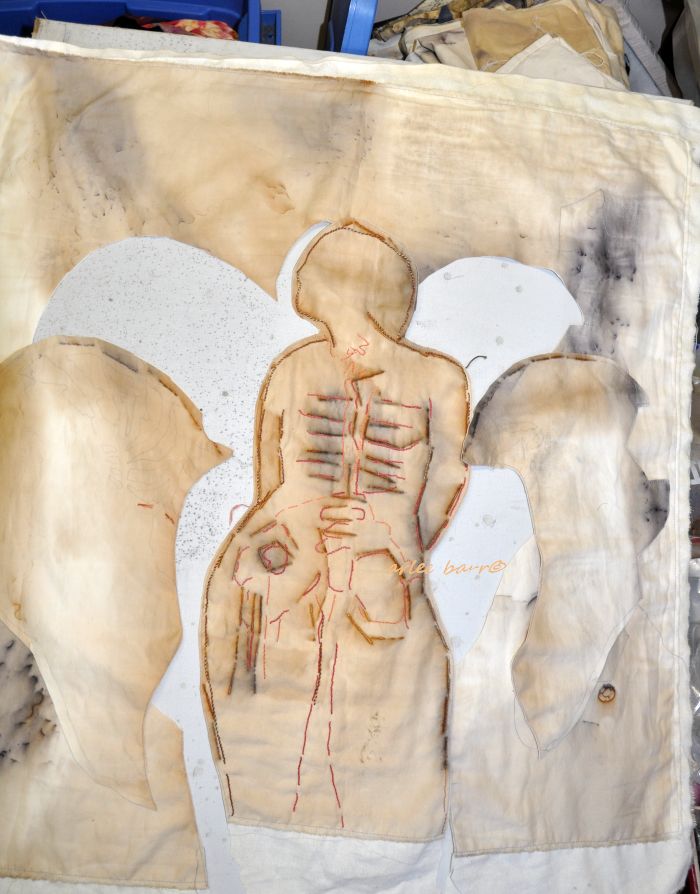
She got this treatment also in October of 2018: body dyed in osage, wings in madder (the iron on this really purpled it!), and the background tossed in a weak indigo vat. (The iron of course affected the osage as well, browning it, which is okay because a bright yellow body would be NFWay 🙂 )
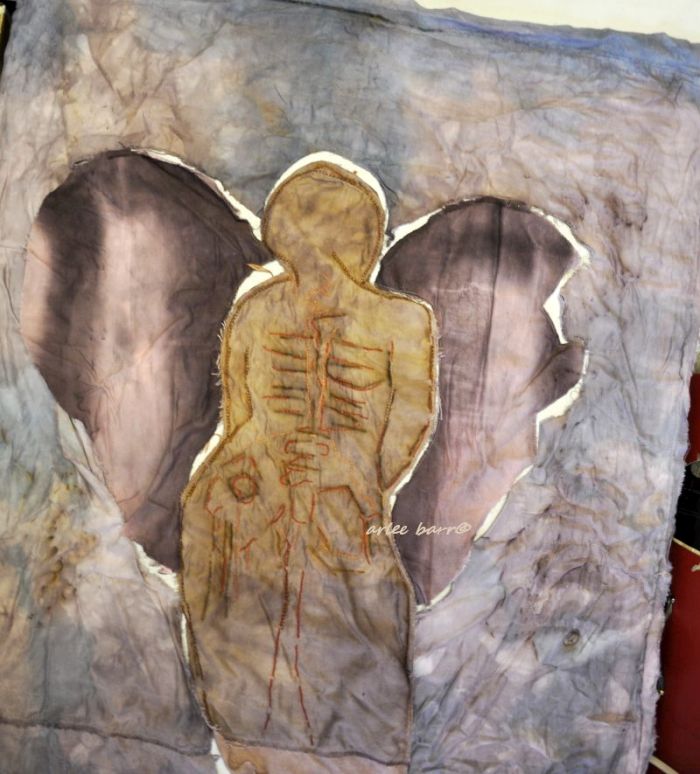
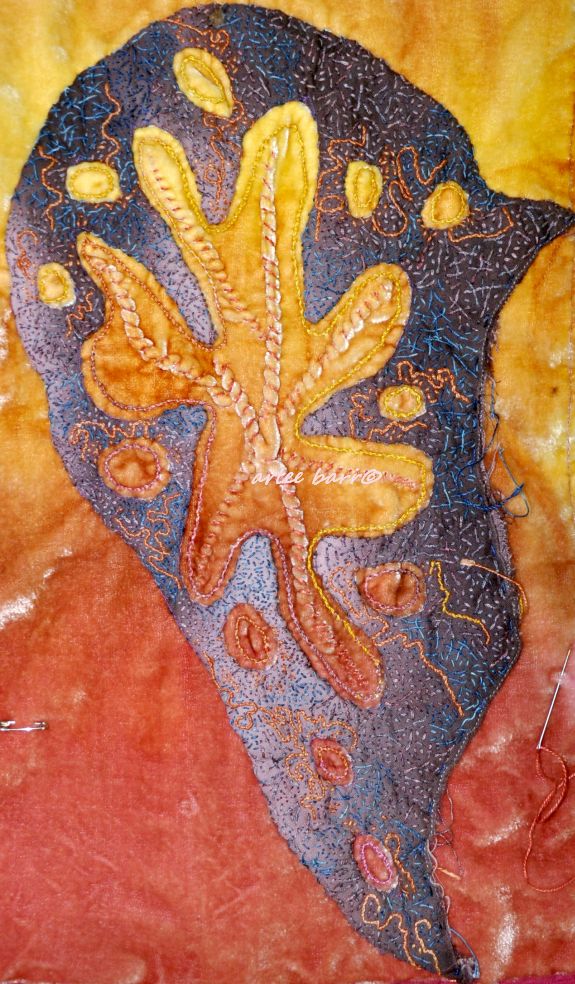
In November, i start stitching the wings and the thread colours really livened up that dark purple:

And the finished wing (mocked in crudely) had ZING when backed with some of my naturally dyed silk velvet:
 Like this:
 The second wing was done in November also, but is STILL not attached to the velvet backing. SIGH.
But, looking at her last week, the background still seems both dark and weak at the same time. So, i got brave again–because it took some teeth gritting and hoofie crossing when i cut her into pieces the first time—pulled the background off its stabilizer, mordanted the cotton with tannin and alum because even though gawdz knows there’s already a lot of iron on it, cellulose fibres do better taking up dye with these premordants, and threw it in a fresh pot of the 34 year old madder.
And so:
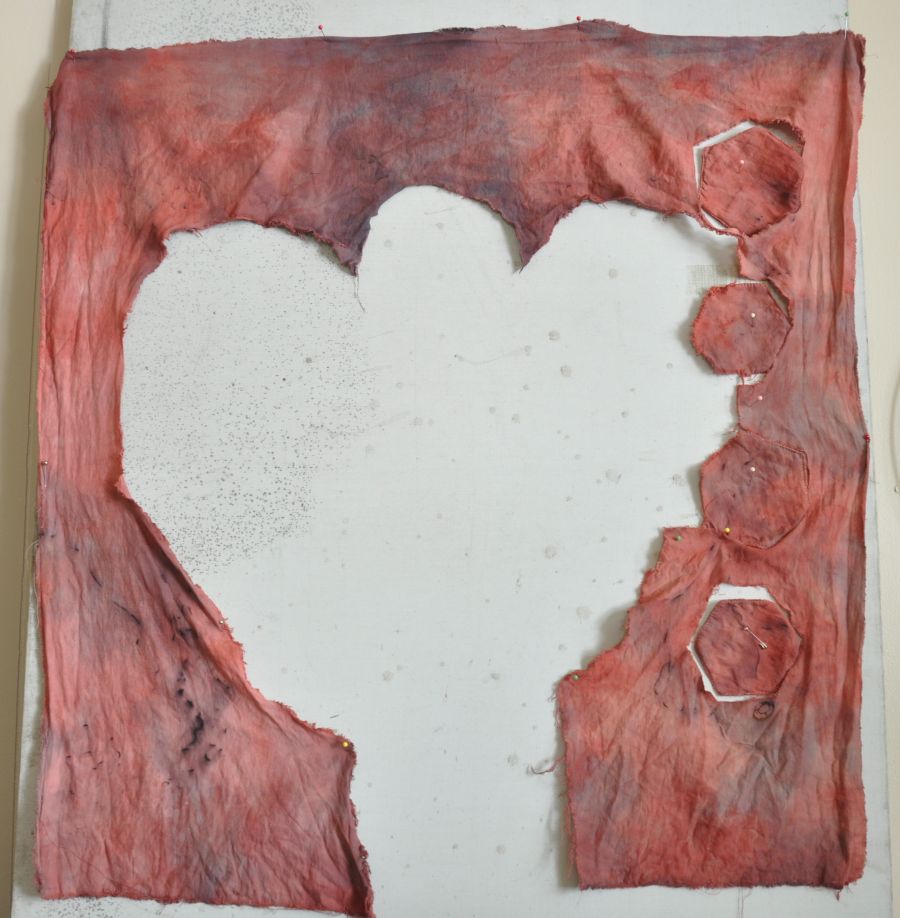
This has been scoured, rusted, washed, dyed, washed, mordanted, and overdyed again, so why now? Ah well, just means more beautiful fabrics behind the hexes, peeking out.
And of course, part of me is incredulous that all the rust and cream coloured fabric is now “gone”, but that’s how it goes. Because you know what? She has a sister! (I did TWO pieces like this during the 2016 session.)
I’m thinking too, her body is much like a husk at the moment, but husks hide secrets that are revealed through peeling away layers. Things escape husks as well, corn silk, seeds, errant old petals. We’ll go with that and see how she evolves there:
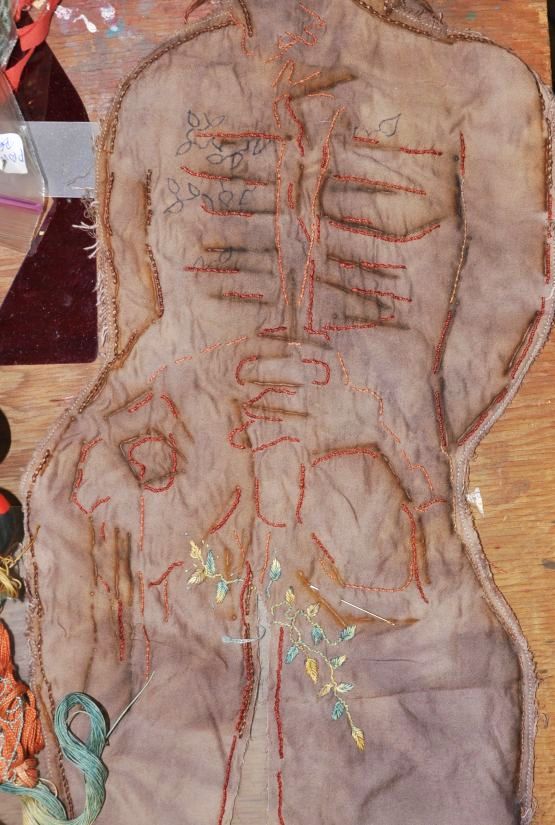
(Something else i realized too: if and when she is ever finished, this will be the first big piece i have done with all natural dyes, from fabric to threads.)
Bets on when she actually soars?
Made in 2013, “The Difference Between A Plum” has travelled a lot of places, without due care as to light conditions. It’s been in well lit galleries, dim areas, fluorescent light, daylight and gawdz knows where else as it made the rounds to various shows. While it’s hard to “match” photos for colour truth, i think these are both very true to the colour it was when made, and the colour it is now.
Iron was integral here as a mordant. Iron deepens and “saddens” colours, can shift to deep purples, blues, garnet, greens, greys and browns, depending on the dye used. (In this case, brazilwood.) It can weaken fibres as well, if the concentration (know as WOF, or weight of fibre ratio to mordant/dye) is too high. I’m pleased to say the fabric still seems quite strong, despite the heavier rust concentrations, though of course, i’m not swinging from the chandelier to test the fact 🙂
Brazilwood is NOT a good dye for lightfastness, though it holds up well to wash fast tests. (Great, you can only wear it in the dark, and wash it in dim light….) BUT surprisingly, this piece is not that different from when i made it six years ago.
Left, the original photo taken in 2013, right the photo taken today:
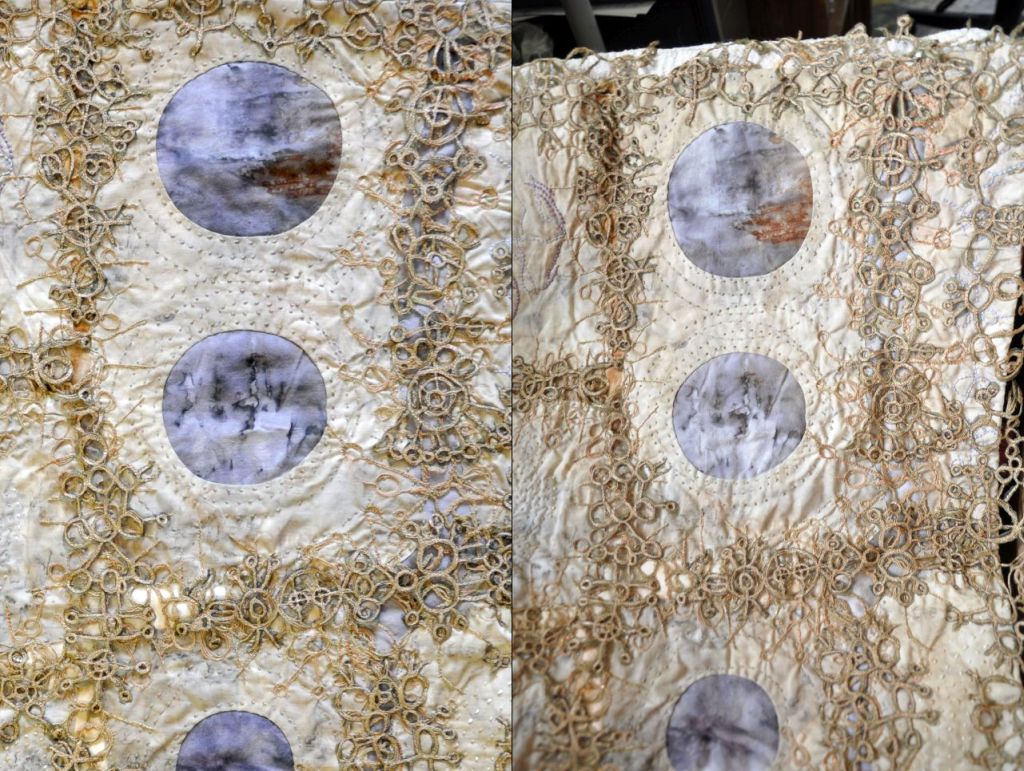
It is noticeable, and yes, 6 years is not that long, BUT i’m still quite happy about the effect time has had on it.
I definitely wouldn’t advise this for clothing that would be worn a lot, or an art piece in a very bright room, but as an artpiece, the evolving colour change is interesting. I wonder how much lighter it will be in another 6 years, or is there a point where residual colour stays?
Whew, Mothers Day WEEK is over. If you’re in the plants and floral industry, it ain’t just one day that ya bust yer ass for!
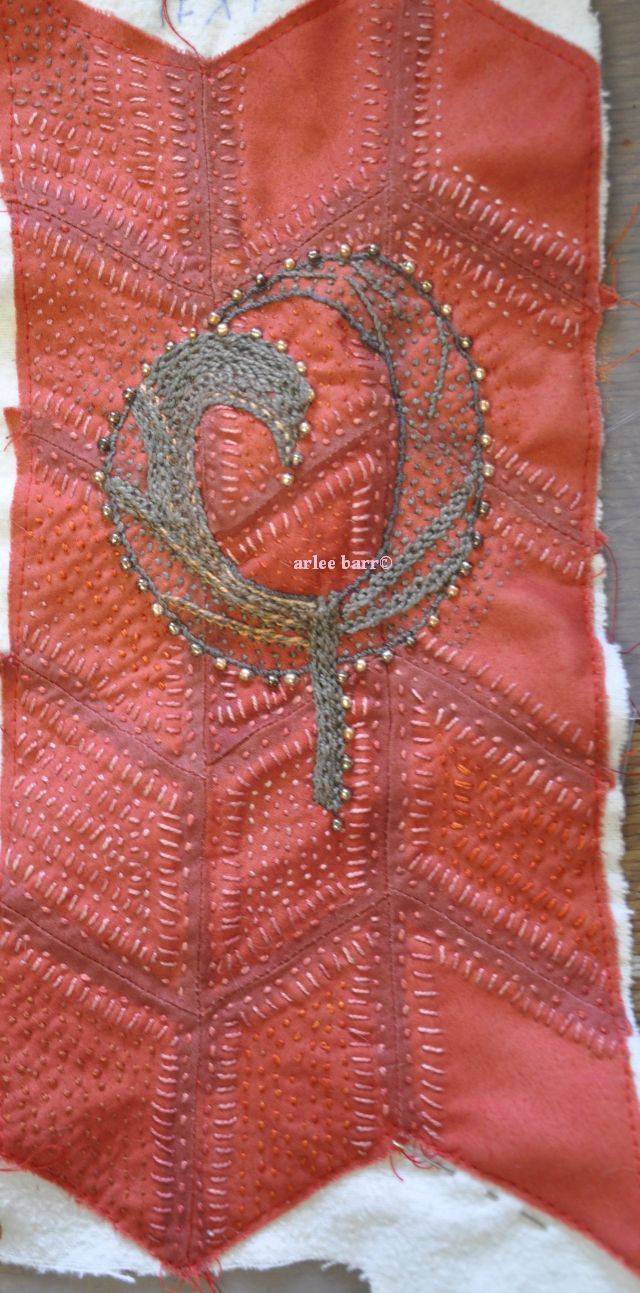
I managed to finish, except for turning the edges, the second piece (#5).
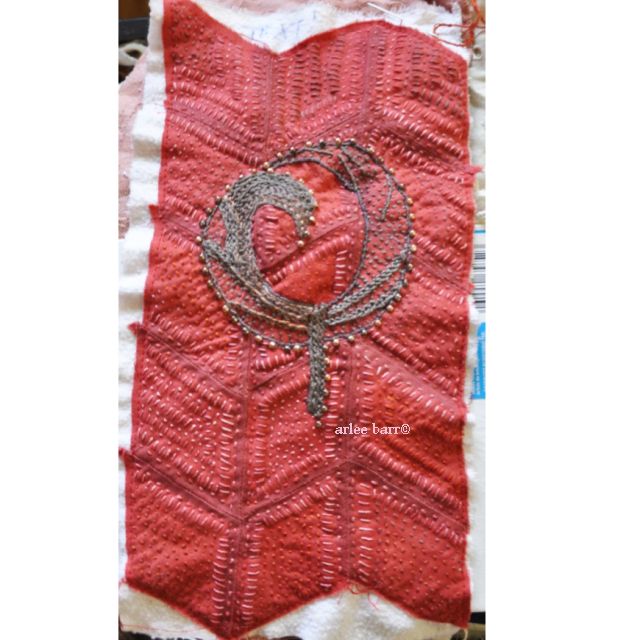 The leaf really rises above the surface, due to the tension of the stitch, so i’m going to pad it out more to keep that dimension.
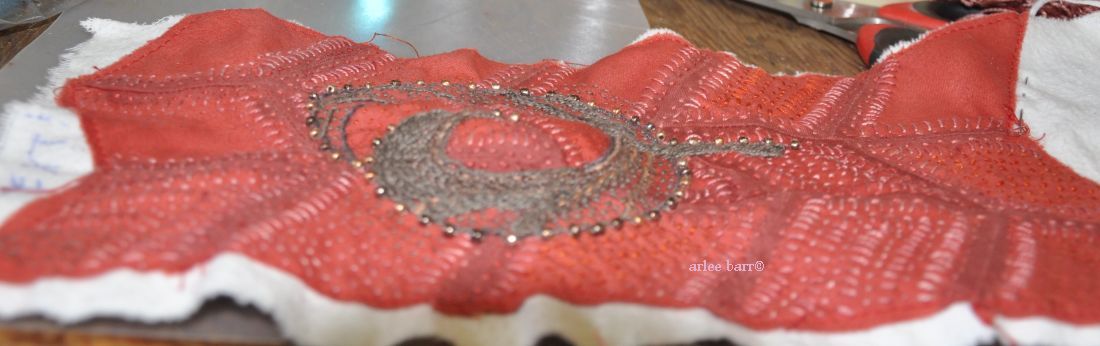
Now i’m onto another, the #7, though not the 7th piece i’ve worked on. 🙂
 I used a copper modifier again, as this is to be “similar” to #5, and added a few circles this time. They are barely readable in the photo above, but will be worked with/around and more evident when the stitching is done.
The “plan”:
 #1 was done first.
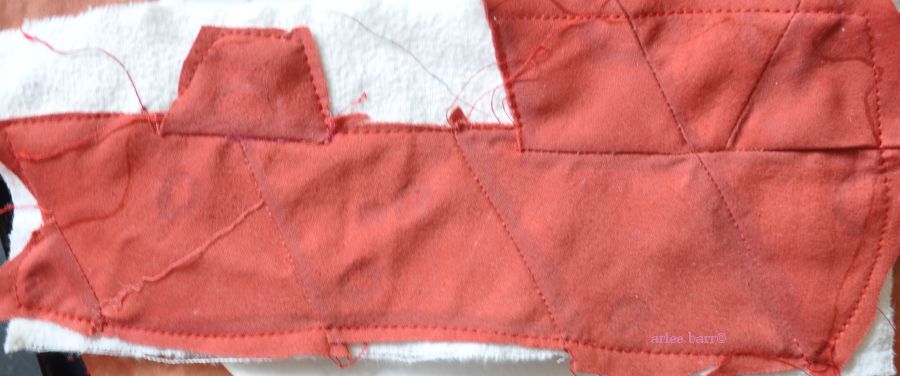
The piecing of the diamonds is sometimes frustrating as i get them sewn backwards, sideways and upside down, and have to take them apart or start all over! The stitching is mindless/”mindful”, something i can easily do during tubage, slow moments or waiting for laundry to dry, ha. All the other pieces are very small, so i might NOT piece diamonds for them, or i may go full tilt and make tinier diamonds…….
The “biggest”, most intense part of the project is actually the Crone, the most important component of all, and then the final stitching of spirals over the blobs, and on the background. She is smaller than figures i’ve worked this way before, and i’m hoping the delicacy won’t be an issue. So technically, i’m further along than i thought.
Next time i do a piece like this, all the diamond blobs will be pieced first, so i can switch amongst them to keep the flow going, rather than cut one, piece one, stitch one…………
Still working on this, albeit very very slowly! Obviously the redder piece is going to need a bigger turn under (or trim) than i thought.
The “loosely based on a eucalyptus” leaf didn’t sing to me, until i added the copper mix beads:
Today should enable finishing the few remaining areas in the diamonds.
The rest of the week will see little studio or stitch corner work done: it’s Mother’s Day week at the ffffFlower Mines, and already i’m tired!
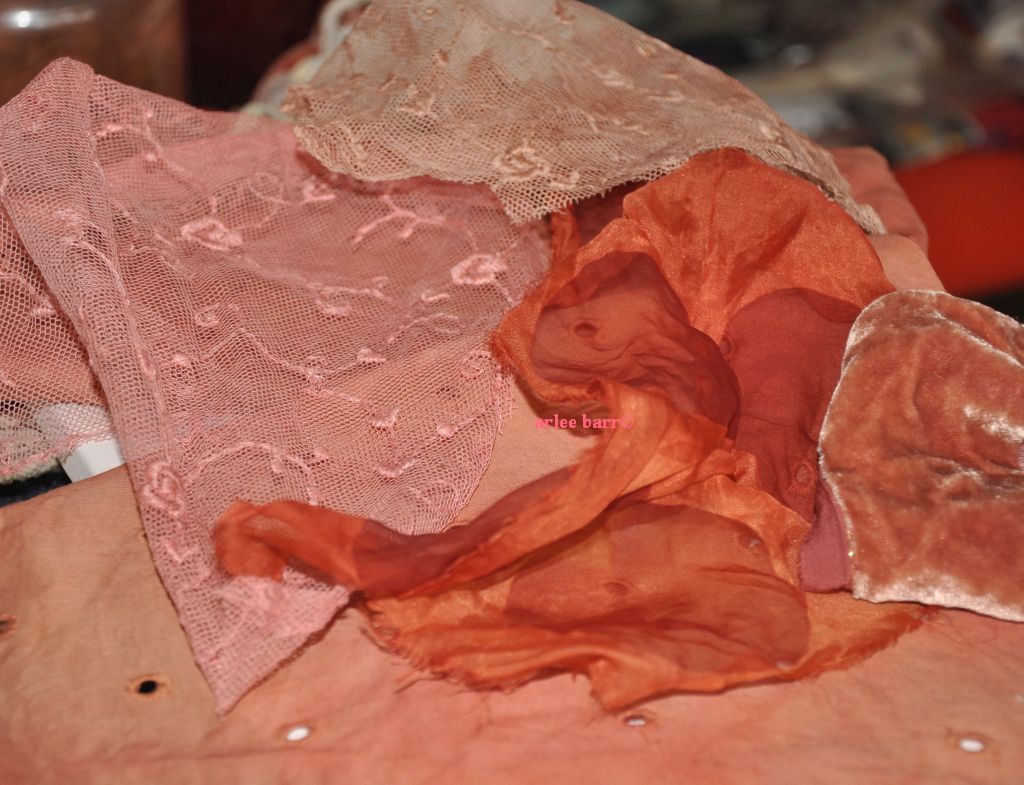
Colour, texture, what’s not to love about these? More of the 34 year old madder results (60+ year old nylon lace, degummed silk, silk/rayon blend velvet, cotton eyelet) ❣️💕💞💓💗💖💘💝❤️
There’s nothing complicated about a lightfast test, so either people don’t know about it, or they choose to ignore it. All it requires is some cardboard or heavy paper, a couple of clips, and your yarn/thread/fabric, a window, and some patience.
A couple winds of thread or yarn, or a 4×4″ piece of fabric is all that’s needed to do this. Cover half with the cardboard or paper so it’s enclosed and clip it so it’s tight. Put in a very bright window. Wait. Wait some more. Leave it for at LEAST a month. Go do whatever else it is you do, but DON’T commit that larger stretch of yarn/thread, or cloth to any project, or sell it.
After a month, unclip it. What’s happened? Here’s hollyhock bloom dyed yarn after a month :
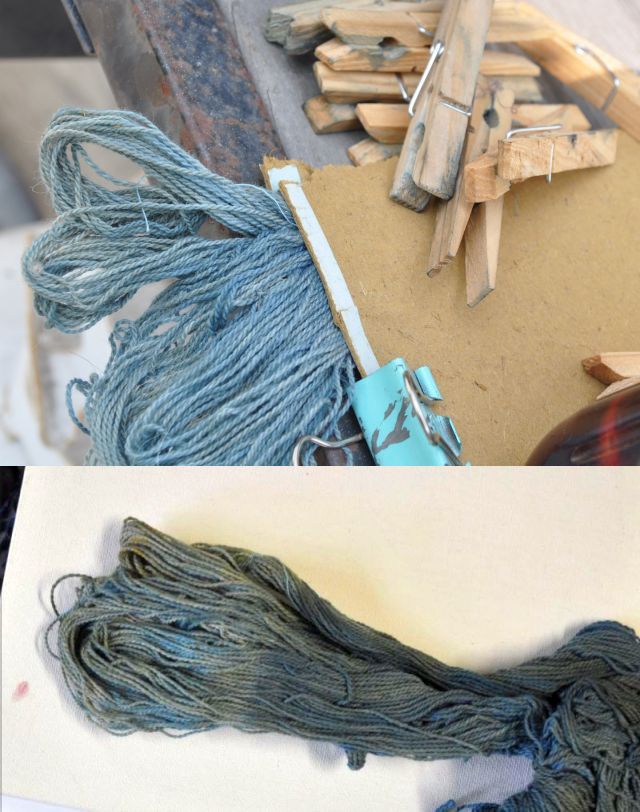
There’s a VERY distinct line where the cardboard covered it. All of my blooms went into the compost. I overdyed this in indigo and while the shade may eventually change *because* of the underlying hollyhock hue, i’m okay with that in work i keep for myself, or to use as stitch samples.
I have a big thick natural dye journal that i started in 2010 at the beginning of this journey. Yesterday i was looking through it and found the photo on the left taken at the time of the tests of alum mordanted fibres and hollyhock, hibiscus and marigold, and compared it to a 9 year stint in the journal, completely covered, and look at the difference. Even the vaunted marigold flower has faded.
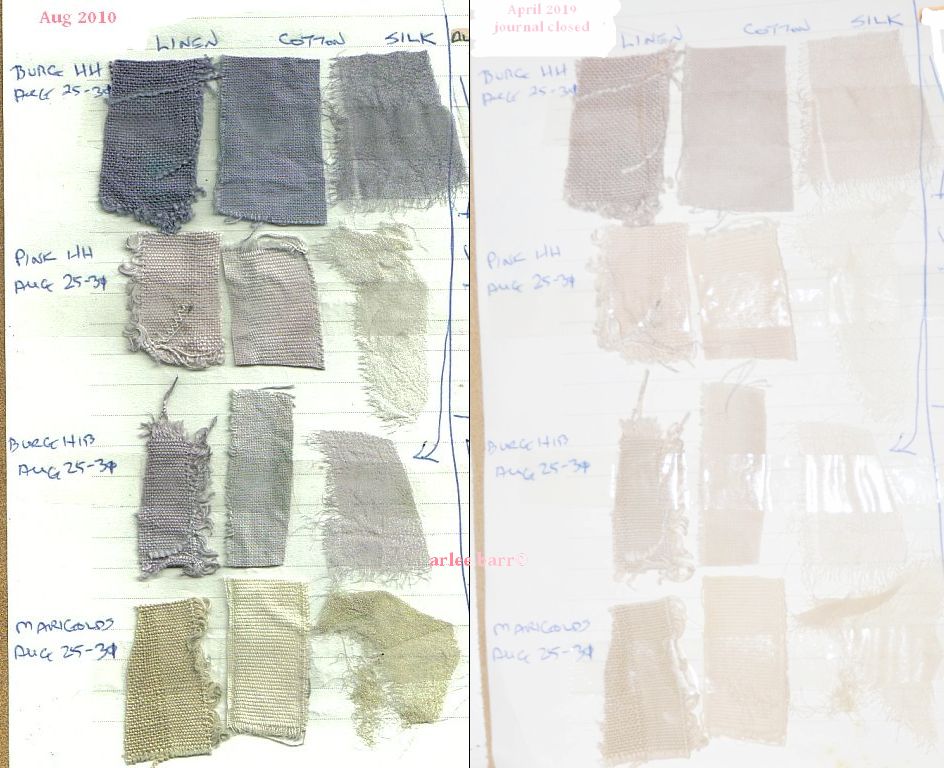 Though i am happy to use marigold, dyer’s chamomile and coreopsis, they will stay in my studio, as this proves to *me* that flowers just don’t have enough strong dye compounds to be useful for long term work. I will never again use flowers like hibiscus, hollyhock or any others that have anthocyanins in them, as the beautiful reds, blues and purples they share, are shared only briefly. EDIT: Since people are getting argumentative about the hollyhock (!!!), see the expert’s opinion here, last paragraph.
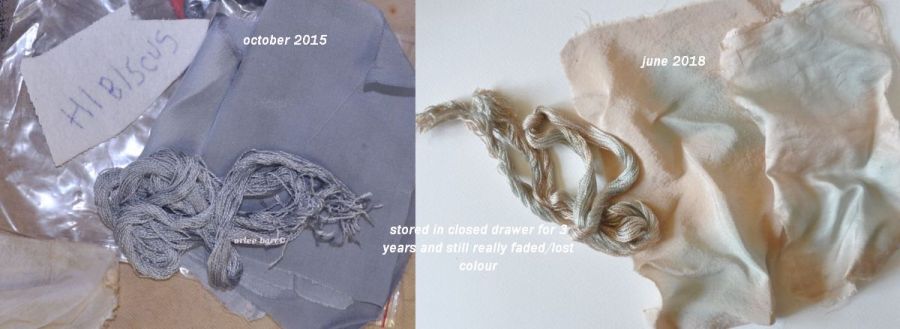
Another hibiscus sample below, stored in a drawer for 3 years:
Below, annatto, the folded over top section the area that was exposed to light for a month:
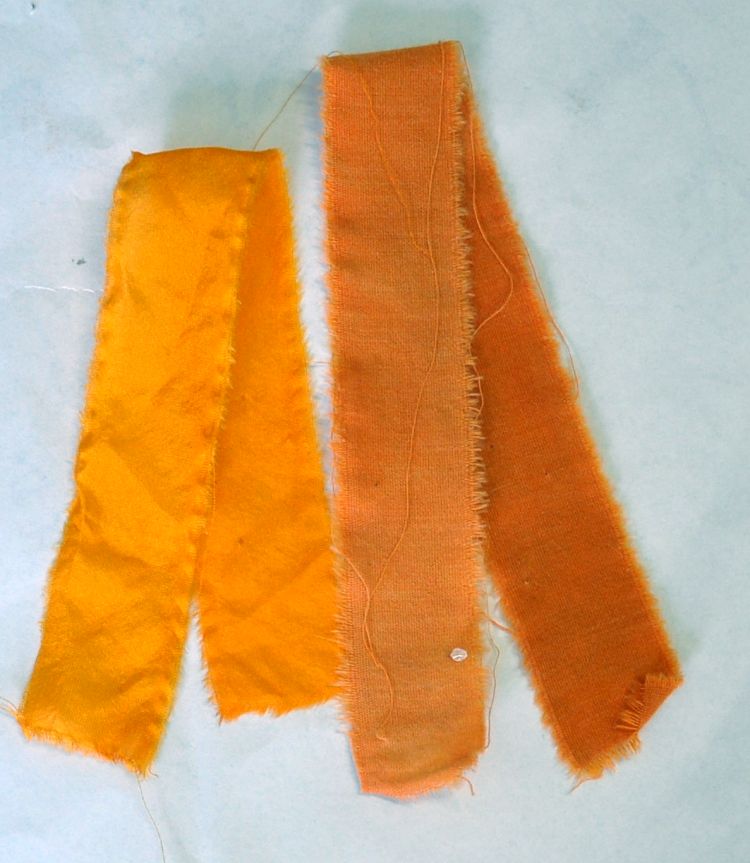
Not as bad a change, but still obvious. Again, i’ll use as a base, or keep in the studio for personal use.
Some natural dyes last better than others, notably madder, indigo and weld, the “grand teint” dyes. Lesser (still very good results in most cases) dyes are most of the others including brazilwood, logwood, fustic, cochineal, sandalwood, cutch, lac etc, ie dyes that are sold by reputable dealers. Tannin rich dyes will eventually oxidize–and that includes avocado–to browns, beiges and mud. Iron will *improve* lightfastness, but does not make anything truly permanent.
Below, a FB friend’s results of lightfastness of avocado:
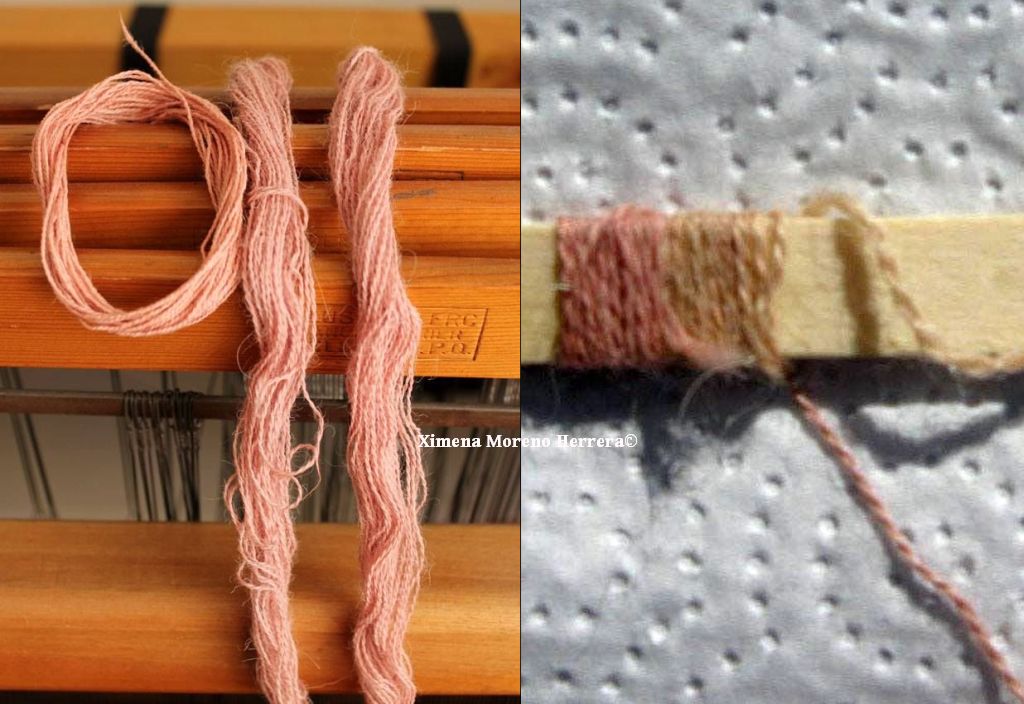 Left, the first result of avocado dyeing, right is after a lightfastness test. You can see the darkening of the tannin as it “ages”, even after covering, and to the right in the right photo 🙂 , the lightening of the colour as it is exposed to sun. Ximena lives in South America, and has access to local lore and plant materials that are indigenous to the continent. We’re shared much information about avocados, tannin use, and “true” dyes, with both of us pointing the way to more scholarly papers, something that either people don’t know about, or don’t care enough about to go so far with research, which is sad because we live in such an information rich world now!
Note: Carol Lee, the one who got deep reds from avocado, has said that even after storage for 10 years, her reds turned to brown, proving avocado colours are tannin only, not a true dye for reds and pinks. The tannin oxidized even away from light.
NOTHING FIXES FUGITIVE, so forget the flowers, and food waste unless you’re happy with “play silks” for the kids, or things for personal use that you can re-dye. Please, don’t sell these. All of this is not to say don’t play, BUT please be aware of longevity and the final use of the finished “product”. Again, i say don’t sell fugitive dyed fabrics and yarns.
I still intend to continue experimenting (playing? 🙂 ) with locally foraged dyes, but now armed with a section from the Boutrup/Ellis book, i know what to look for in these forays. Admittedly, early peoples, and settlers to this continent discovered certain plants dyed well enough for their end use, so we’ll go with that. Accurate scouring, mordanting, possible post mordanting and/or modifying, light fast and wash fast tests DO make things last better.
What it all boils down to is: whenever you are trying a plant material for a natural dye, and can find no information on it as to whether or not it works, do a lightfast test.
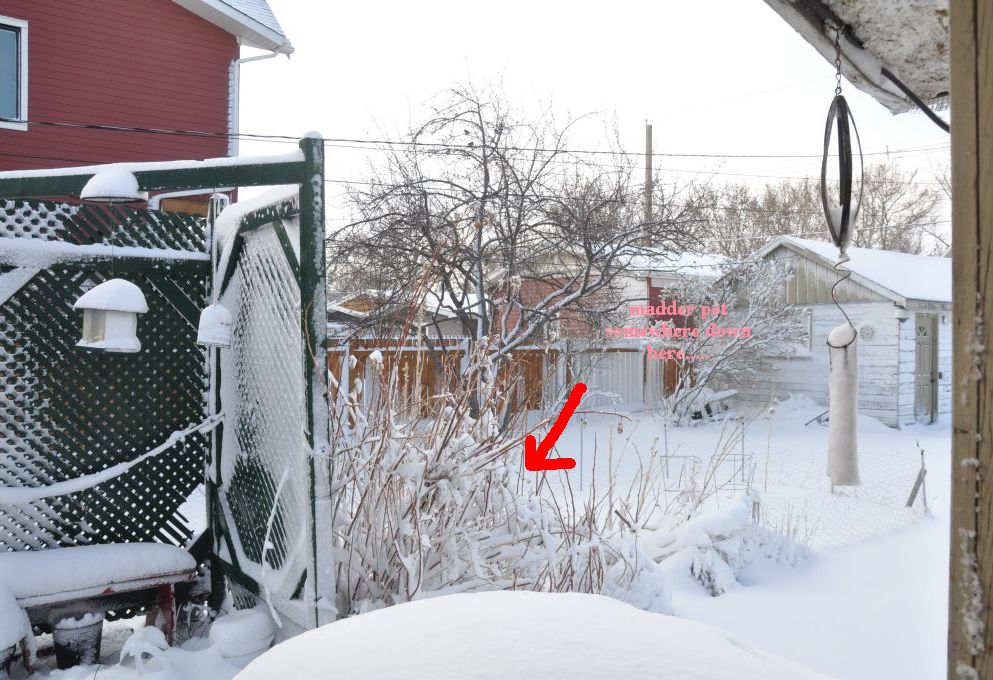
While you are all posting pictures of fields of buttercups, gardens of woad, and the leaves and flowers you picked on a walk, i am worrying about the madder i uncovered last week. This is what i woke up to this morning in Calgary!
 It was a horrendous night: flickering lights, eddies of swirling 90K driven snow devils around the house, no visibility, and the DogFaced Girl sounding like a Dire Wolf (reacting to fire truck sirens, because of course, though snow happens EVERY year in Alberta, 90% of drivers forget how to drive in it….). So, we battened down the hatches, piled onto the couch with the last beer to share, some snacks and continued our binge watching of GoT. Typical Alberta winter survival mode 🙂
This madder has survived two of our usual harsh winters, by being heeled into the garden in its pot, but i’m concerned any new growth may be damaged this time. Previous years, there was no snow after the uncovering!
Since madder is a “crop” that doesn’t get harvested until it’s third year, i’m hoping too that the roots have survived, as this is the summer i’m supposed to start using it. I have three scraggly little plants inside, cuttings in the fall from the mother plant that took root, but having to wait another three years for them? POOP.
And of course, several days previous to this, i had noticed tiny leaves popping up from the dyer’s chamomile in the back40………
HOOFIES CROSSED that all survive!!!!!!!!!!!!!!

You must be logged in to post a comment.