Posted in Collision: the work begins, embrilting, in progress, Natural Dyes, Naturally dyed threads

Crone progress

Still working on this, albeit very very slowly! Obviously the redder piece is going to need a bigger turn under (or trim) than i thought.

The “loosely based on a eucalyptus” leaf didn’t sing toΒ  me, until i added the copper mix beads:

Today should enable finishing the few remaining areas in the diamonds.

The rest of the week will see little studio or stitch corner work done: it’s Mother’s Day week at the ffffFlower Mines, and already i’m tired!

Posted in Madder, Natural Dyes

SWOON

Colour, texture, what’s not to love about these? More of the 34 year old madder results (60+ year old nylon lace, degummed silk, silk/rayon blend velvet, cotton eyelet) β£οΈπŸ’•πŸ’žπŸ’“πŸ’—πŸ’–πŸ’˜πŸ’β€οΈ

Posted in natural dye research, Natural Dyes

how to do a lightfast test for natural dyes

There’s nothing complicated about a lightfast test, so either people don’t know about it, or they choose to ignore it. All it requires is some cardboard or heavy paper, a couple of clips, and your yarn/thread/fabric, a window, and some patience.

A couple winds of thread or yarn, or a 4×4″ piece of fabric is all that’s needed to do this. Cover half with the cardboard or paper so it’s enclosed and clip it so it’s tight. Put in a very bright window. Wait. Wait some more. Leave it for at LEAST a month. Go do whatever else it is you do, but DON’T commit that larger stretch of yarn/thread, or cloth to any project, or sell it.

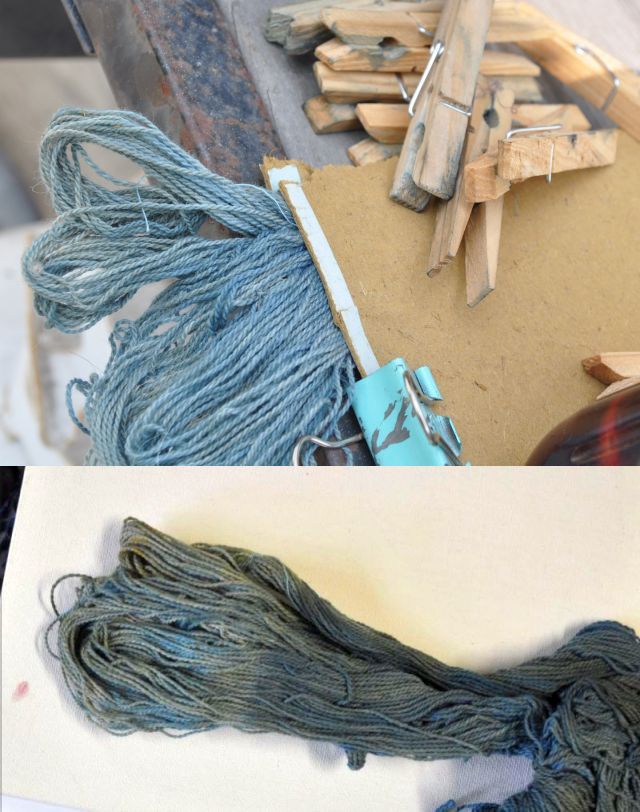
After a month, unclip it. What’s happened? Here’s hollyhock bloom dyed yarn after a month :

There’s a VERY distinct line where the cardboard covered it. All of my blooms went into the compost. I overdyed this in indigo and while the shade may eventually change *because* of the underlying hollyhock hue, i’m okay with that in work i keep for myself, or to use as stitch samples.

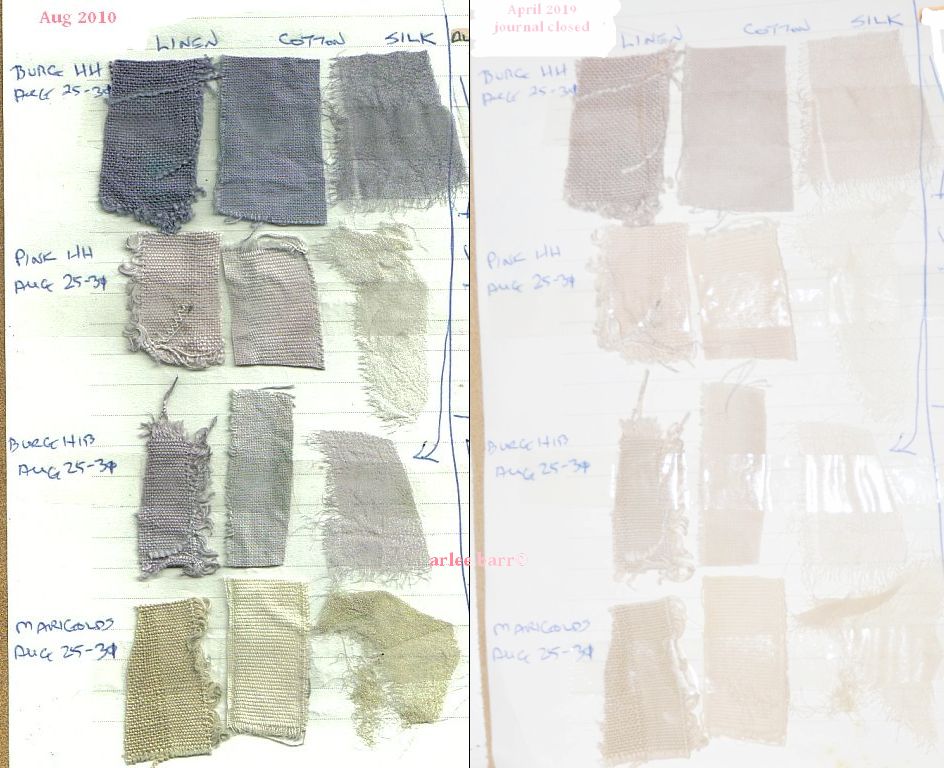
I have a big thick natural dye journal that i started in 2010 at the beginning of this journey. Yesterday i was looking through it and found the photo on the left taken at the time of the tests of alum mordanted fibres and hollyhock, hibiscus and marigold, and compared it to a 9 year stint in the journal, completely covered, and look at the difference. Even the vaunted marigold flower has faded.

Though i am happy to use marigold, dyer’s chamomile and coreopsis, they will stay in my studio, as this proves to *me* that flowers just don’t have enough strong dye compounds to be useful for long term work. I will never again use flowers like hibiscus, hollyhock or any others that have anthocyanins in them, as the beautiful reds, blues and purples they share, are shared only briefly. EDIT: Since people are getting argumentative about the hollyhock (!!!), see the expert’s opinion here, last paragraph.

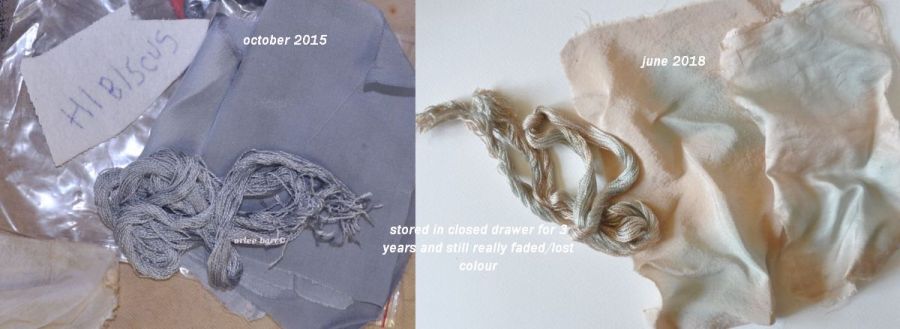
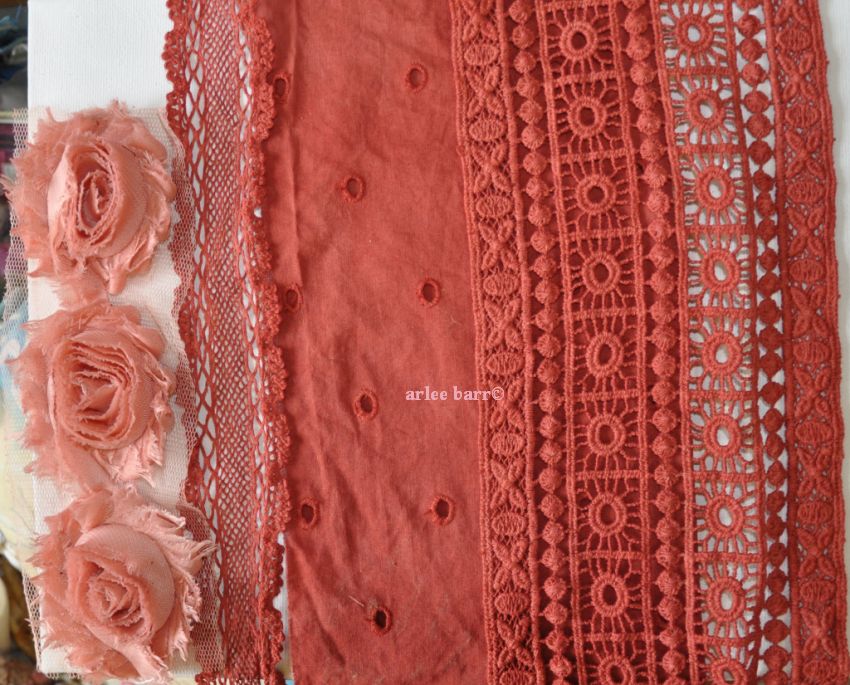
Another hibiscus sample below, stored in a drawer for 3 years:

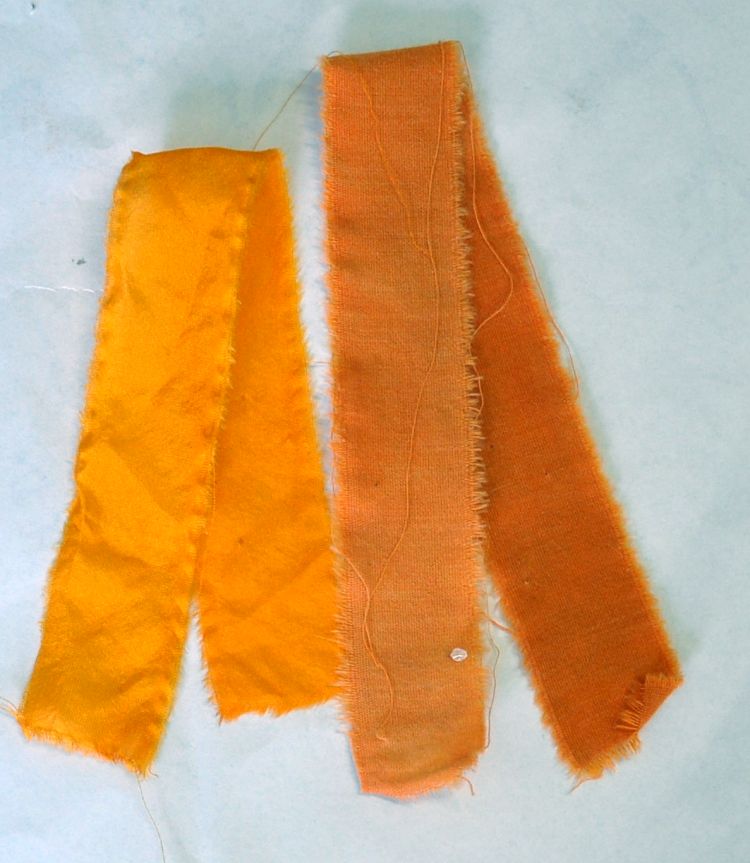
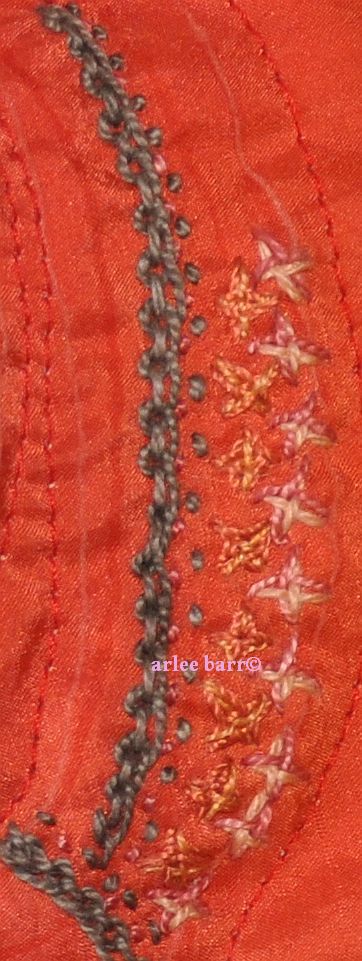
Below, annatto, the folded over top section the area that was exposed to light for a month:

Not as bad a change, but still obvious. Again, i’ll use as a base, or keep in the studio for personal use.

Some natural dyes last better than others, notably madder, indigo and weld, the “grand teint” dyes. Lesser (still very good results in most cases) dyes are most of the others including brazilwood, logwood, fustic, cochineal, sandalwood, cutch, lac etc, ie dyes that are sold by reputable dealers. Tannin rich dyes will eventually oxidize–and that includes avocado–to browns, beiges and mud. Iron will *improve* lightfastness, but does not make anything truly permanent.

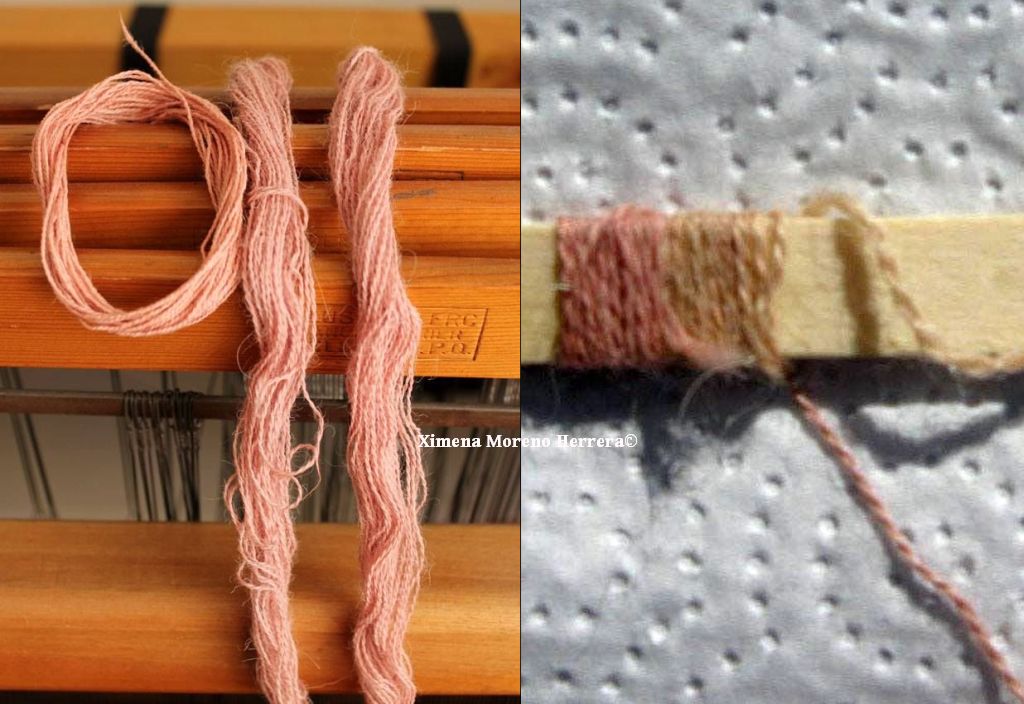
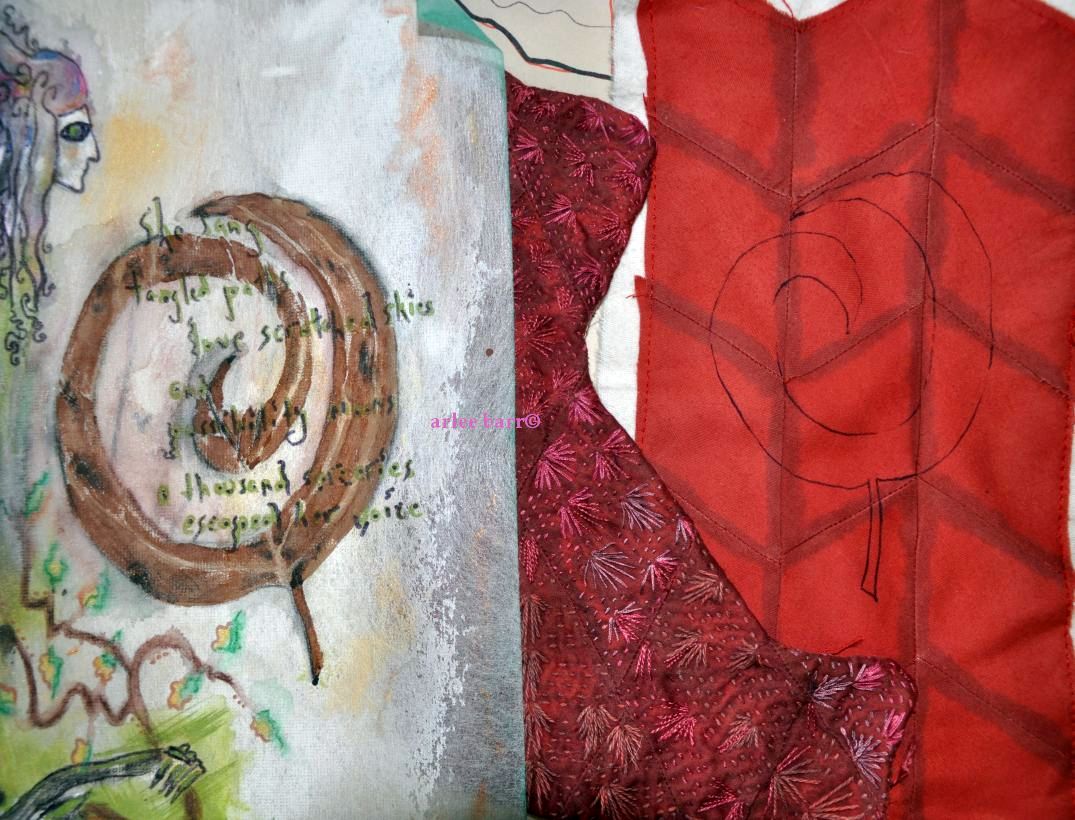
Below, a FB friend’s results of lightfastness of avocado:

Left, the first result of avocado dyeing, right is after a lightfastness test.Β  You can see the darkening of the tannin as it “ages”, even after covering, and to the right in the right photo πŸ™‚ , the lightening of the colour as it is exposed to sun. Ximena lives in South America, and has access to local lore and plant materials that are indigenous to the continent. We’re shared much information about avocados, tannin use, and “true” dyes, with both of us pointing the way to more scholarly papers, something that either people don’t know about, or don’t care enough about to go so far with research, which is sad because we live in such an information rich world now!

Note: Carol Lee, the one who got deep reds from avocado, has said that even after storage for 10 years, her reds turned to brown, proving avocado colours are tannin only, not a true dye for reds and pinks. The tannin oxidized even away from light.

NOTHING FIXES FUGITIVE, so forget the flowers, and food waste unless you’re happy with “play silks” for the kids, or things for personal use that you can re-dye. Please, don’t sell these. All of this is not to say don’t play, BUT please be aware of longevity and the final use of the finished “product”. Again, i say don’t sell fugitive dyed fabrics and yarns.

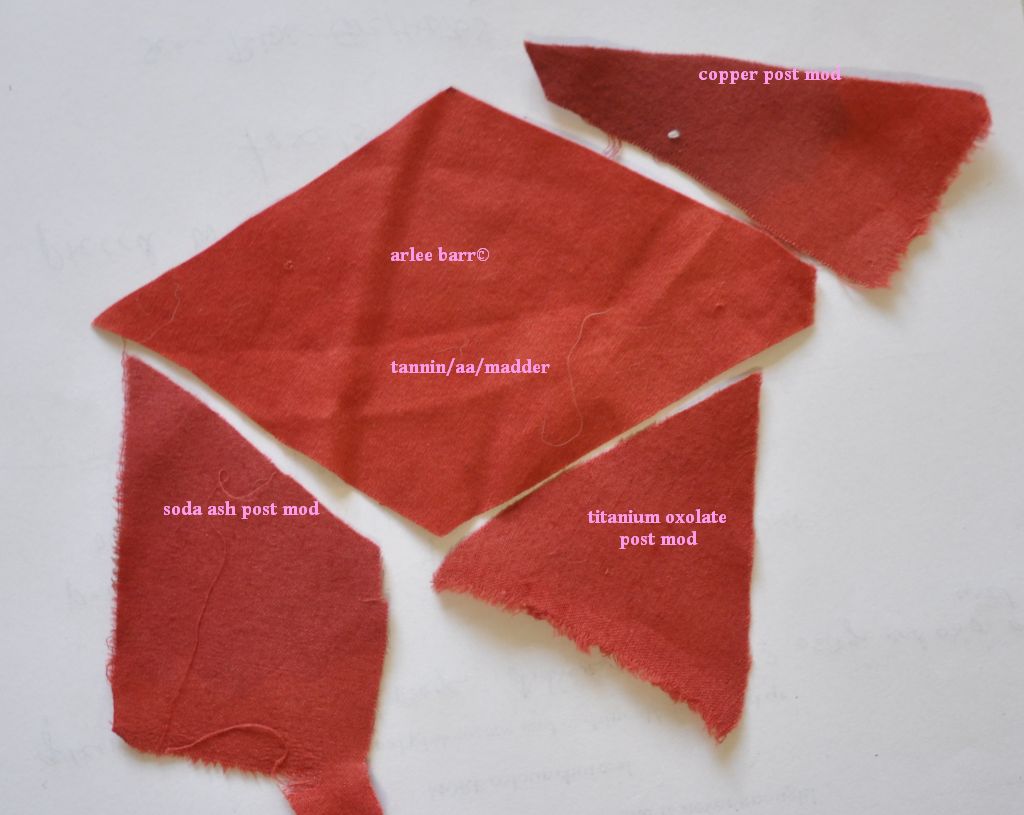
I still intend to continue experimenting (playing? πŸ™‚ ) with locally foraged dyes, but now armed with a section from the Boutrup/Ellis book, i know what to look for in these forays. Admittedly, early peoples, and settlers to this continent discovered certain plants dyed well enough for their end use, so we’ll go with that. Accurate scouring, mordanting, possible post mordanting and/or modifying, light fast and wash fast tests DO make things last better.

What it all boils down to is: whenever you are trying a plant material for a natural dye, and can find no information on it as to whether or not it works, do a lightfast test.

Posted in garden dye plants, Garden Hard, Madder, Natural Dyes

Alberta dye garden woes

While you are all posting pictures of fields of buttercups, gardens of woad, and the leaves and flowers you picked on a walk, i am worrying about the madder i uncovered last week. This is what i woke up to this morning in Calgary!

It was a horrendous night: flickering lights, eddies of swirling 90K driven snow devils around the house, no visibility, and the DogFaced Girl sounding like a Dire Wolf (reacting to fire truck sirens, because of course, though snow happens EVERY year in Alberta, 90% of drivers forget how to drive in it….). So, we battened down the hatches, piled onto the couch with the last beer to share, some snacks and continued our binge watching of GoT. Typical Alberta winter survival mode πŸ™‚

This madder has survived two of our usual harsh winters, by being heeled into the garden in its pot, but i’m concerned any new growth may be damaged this time. Previous years, there was no snow after the uncovering!

Since madder is a “crop” that doesn’t get harvested until it’s third year, i’m hoping too that the roots have survived, as this is the summer i’m supposed to start using it. I have three scraggly little plants inside, cuttings in the fall from the mother plant that took root, but having to wait another three years for them? POOP.

And of course, several days previous to this, i had noticed tiny leaves popping up from the dyer’s chamomile in the back40………

HOOFIES CROSSED that all survive!!!!!!!!!!!!!!

Posted in cochineal, FybreSpace the shop, Madder, osage, quebracho rojo, sandalwood

Easter dyeing

No eggs!

OH MY GAWDZ, this 34 year old madder!!!!!

No fuss, no messing around, our mountain-hard tap water, a couple of Tums, a bit of a simmer and BANG.

I think i’d be hoarding this stuff if i was parsimonious with my cloth–but then what’s the point? Just wish the supplier was still around!

Coupled with a chunk of silky silk velvet dyed in quebracho rojo, there are TWO of these packs in the shop, along with others (ONE each) in various permutations of osage, sandalwood, quebracho rojo and cochineal. DELICIOUS! EDIT: ONE pack left of the seven. Β  Β  SOLD OUTΒ Β Β Β 

I will be dyeing again this week, and will have more packs in the store, slightly different.

Posted in Collision: the work begins, embrilting, in progress, Naturally dyed threads

part 2, of many

Not going to show you the aborted and horrifying first attempt for the euc leaf on the second section πŸ™‚ I decided to keep that part simple instead and embroider on the section itself.

Just as well, because the text would be problematic to do over the edges of an applied piece. I’m not necessarily for taking the easy way out, but i think i made the right choice here. I’m also not sure i need to add the text at all. Or maybe i add it elsewhere on the piece as a whole. Or at the very least, part of it could become the name of the piece!

I did learn two new stitches though!

The walnut thread is the Pekinese stitch, something i’d love to do as a massed line/shape, and with my anchor stitches smaller. The paler colours (osage and sandalwood) are a woven cross stitch. That second one should be done with a heavier thread to show the effect, but i’m also convinced that it’s just easier to do it as a small weaving if you want more “legs” than the basic stitch has, rather than the awkwardness of trying to go through the same holes and lay threads flat enough to give the shape to it! The basic tute is on Sharon B’s Pintangle, though i went from my stitch bible, Jacqueline Enthoven’s “The Stitches of Creative Embroidery”. You can’t see the extra legs i did though because the silk thread is so fine. Nice lustre, but no definition!

The Pekinese stitch is good for the leaf, though in its new incarnation. Textural, and with the walnut thread and judicious use of paler earth tones, a good almost bas-relief translation of the original sketch. I’ll blend in the lighter threads so they are not so “liney” :), and finish filling in the diamonds as well. The whole when attached to the backing, won’t be as pointy either!


Posted in Collision: the work begins, embrilting, in progress, journal: lessons to learn, Natural Dyes, Poetry: text and textiles

Note to Self: check notes to self

It might not be set in stone, but there is/was/is a plan for this piece.

I looked through my “stitchionaries” (photo detail files of work previously done), my stitch bibles, online at new stitches, scribbled and sketched and thought, drooled on my thread choices and pondered and pondered. How am i going to treat this section, without it being too dense, but also to “fit” with the first section done?

DUH. What’s the piece that prompted this?

Obviously, it’s not going to be squared off like this quick cut and paste πŸ™‚

I think the leaf needs to be a separate piece applied on top of this section, and the embroidery done over and around it.

Posted in Collision: the work begins, embrilting, in progress, mordants and modifiers, Natural Dyes

building parts

Above, the first section completed. You can see the big difference on that worked section that the iron post modification made on the clear red of the original madder. (Post mod was done before stitching with quebracho rojo, cochineal and madder on silk and cotton threads.)

While i want the next section i’m working on to be a truer red, i want some nuance as well to riff the threads off. I tried post mods of soda ash, titanium oxolate and copper.

The soda ash dulled the red, the TO made it slightly orangey, and the copper, while darker and similar to the iron used before, is more what i wanted.

Though the lines are “obvious”, the threads chosen will soften the harder edges. Three shades of madder on cotton, silk and cotton, and a sandalwood on cotton should start me nicely.

I do have yet to decide which stitches i will use. I don’t want it as tightly massed as the finished section, but not really “open” and loose either.

Back to my Stitchionary for perusal and tests.

Posted in Collision: the work begins, embrilting, in progress, Natural Dyes, Naturally dyed threads

don’t set it in stone

I’m not sure who snuck into my studio the day i pieced this section and made it a different shape than “the plan”.Β  Doesn’t matter though, a plan is just a piece of paper, the work is what counts.

As i worked this, i also wondered if i had made myself extra work by piecing it first: does it matter that it’s many sections? Could i have done it as one piece which would have necessitated more marking, so maybe the same or more work to begin with anyways? From a distance, the diamonds don’t register as separate chunks. Would i feel as gratified if i had used one larger piece, that might have been closer to the original shape?

Does it make any difference in the end? If i had left the diamond shapes obvious around the edges, as i did this piece, maybe. Something to consider for future work. Should square pegs be forced into round holes? Reminds me of some ecoprint work that is COVERED in embroidery–well, now you can’t see the ecoprint, so wtf was the point of using it? Work with something, not against or despite it.

I could do this again, with smaller pieces and see if the rougher edges work. Mock up first, before i commit.

PS My quebracho rojo threads ran out, so i also used madder post modified with iron, dark cochineal, and a qr overdyed on bad lichen ( πŸ™‚ )